Building Raised Patio Planters: A Step-by-Step Guide
Content Outline
- Introduction
- Materials required for building raised patio planters
- Steps to build raised patio planters
- Caring for your raised patio planters
- Conclusion
Introduction
Raised patio planters are a great way to add greenery to your outdoor living space. Not only do they allow you to grow plants in a limited space, but they can also provide a unique visual element to your patio.
According to a survey conducted by the National Gardening Association, container gardening is on the rise, with millennials being the largest group of new gardeners. Raised patio planters are a popular choice for container gardening because they can be customized to fit any patio size and style.
When considering raised patio planters, it's important to think about the materials they are made of. Popular choices include wood, metal, and plastic. Each material has its own advantages and disadvantages, so it's important to do your research and choose the best material for your specific needs.
Another factor to consider is the size and shape of the planter. Some planters may be better suited for smaller plants, while others can accommodate larger plants and even small trees. Additionally, some planters may be rectangular or square, while others may be circular or irregularly shaped.
Overall, raised patio planters are a versatile and attractive way to add some greenery to your outdoor living space. Keep in mind the materials, size, and shape when choosing the perfect planter for your patio.
For more information on raised patio planters and container gardening, check out this helpful Better Homes and Gardens article.
Introduction - A. Definition of raised patio planters
Raised patio planters are a type of container gardening solution that is becoming increasingly popular among urban gardeners and homeowners with limited outdoor space. As the name suggests, these planters are raised above the ground level and are placed directly on a patio or deck. They come in various sizes, shapes, and materials, such as wood, metal, and plastic.
The main advantage of raised patio planters is that they allow you to grow plants in a confined and controlled environment. This is especially beneficial for those who are looking to grow vegetables, herbs, or flowers in small spaces. Raised patio planters also provide easy access to your plants and can be designed to match your patio or deck decor.
Benefits of Raised Patio Planters
- Improved drainage: Raised patio planters provide better drainage compared to traditional in-ground gardening, which can help prevent overwatering and root rot.
- Protection from pests: Elevated planters can help protect your plants from pests such as slugs, snails, and rabbits.
- Better soil quality: Raised patio planters allow you to control the soil quality and nutrients, which can improve plant growth and health.
- Increased accessibility: Raised patio planters are easy to access, which makes planting, watering, and harvesting much easier, especially for those with limited mobility.
Overall, raised patio planters are a great solution for those looking to grow plants in small spaces or for those who want to add a touch of greenery to their patio or deck. With their numerous benefits and versatility, it's no wonder they are becoming a popular choice for urban gardeners and homeowners alike.
If you're interested in learning more about raised patio planters, check out our raised patio planters guide for tips and tricks on how to get started.
🚀 Ready to Reinvent Your Garden?
Join thousands of homeowners who have transformed their gardens using our AI design tool. Upload one photo to explore endless possibilities.
Get your AI garden designs →Introduction - B. Importance of using raised patio planters for gardening
Gardening has become a popular hobby for many people, but not everyone has the space or resources to have a traditional garden. This is where raised patio planters come in handy. These planters are a great way to grow plants in a small space, without the need for a large garden or yard. In this article, we will explore the importance of using raised patio planters for gardening.
Benefits of using raised patio planters
- Improved drainage: Raised patio planters allow for better drainage, which is essential for healthy plant growth. The soil in raised planters is less likely to become waterlogged, which can lead to root rot.
- Higher yields: Raised planters can produce higher yields than traditional gardens, as the soil is typically richer and plants can be spaced closer together.
- Less strain: Raised planters are easier to maintain, as they are at a comfortable height for gardening without straining your back or knees.
- Less weeding: Raised planters are less prone to weeds, as the soil is contained and less likely to be contaminated with weed seeds.
The importance of proper placement
While raised patio planters offer many benefits, it is important to properly place them for optimal plant growth. The planters should be placed in an area with adequate sunlight and protection from wind and extreme temperatures. Additionally, it is important to choose the right plants for the planter and to properly space them to avoid overcrowding.
Conclusion
Raised patio planters are a great option for gardening in small spaces and offer many benefits over traditional gardens. By providing improved drainage, higher yields, less strain, and less weeding, raised planters can help you achieve a successful and enjoyable gardening experience. Proper placement and plant selection are key to ensuring optimal plant growth and yield. Consider using raised patio planters for your next gardening project.
Sources:
- The Old Farmer's Almanac - How to Use Raised Garden Beds
- Gardening Know How - How to Make a Raised Patio Planter
Materials required for building raised patio planters
Building raised patio planters is a great way to add some greenery to your outdoor living space. Before you get started, you will need to gather the necessary materials:
- Pressure-treated lumber or cedar boards
- Galvanized screws
- Landscape fabric
- Gravel
- Potting soil
- Plants or seeds
The type of lumber you choose will depend on your personal preference and budget. Pressure-treated lumber is more affordable, but some people prefer the natural look of cedar. Whichever material you choose, make sure it is rated for ground contact to prevent rotting.
Galvanized screws are recommended over nails because they are more durable and resistant to rust. Landscape fabric is used to line the bottom of the planter to prevent weeds from growing up through the soil. Gravel is added on top of the fabric to improve drainage.
When selecting potting soil, look for a mix that is formulated for container gardening. This type of soil is designed to retain moisture and provide adequate drainage. You can choose to grow flowers, herbs, or vegetables in your raised patio planter depending on your interests.
Overall, building raised patio planters requires some initial investment in materials, but it is a rewarding project that can provide long-lasting beauty and functionality to your outdoor space.
According to a study by the National Gardening Association, 35% of all households in the US grow food either at home or in a community garden. Raised patio planters can be a great way to start growing your own food, even if you have limited space.
Sources:
- Better Homes & Gardens - Build a Raised Planter
- Gardening Know How - Raised Bed Soil Preparation
- National Gardening Association - Garden to Table: A 5-Year Look at Food Gardening in America
Steps to Build Raised Patio Planters
Building raised patio planters is a great way to add some greenery to your outdoor living space. Here are some steps to follow:
- Choose the location where you want to build the raised patio planter. Make sure it gets enough sunlight and has good drainage.
- Determine the size and shape of your planter. Consider the type of plants you want to grow and how much space they will need.
- Measure and mark the area where you will build the planter. Use stakes and string to create an outline.
- Excavate the area within the outline to a depth of at least 6 inches. Level the ground and remove any rocks or debris.
- Build the frame of the planter using pressure-treated lumber or rot-resistant wood. Use galvanized screws or nails to attach the boards together.
- Line the bottom and sides of the planter with landscape fabric to prevent soil erosion and weed growth.
- Fill the planter with a high-quality soil mix that is rich in nutrients and promotes good drainage.
- Plant your desired plants in the planter and water them regularly.
When building raised patio planters, it is important to consider the materials you use. Pressure-treated lumber and rot-resistant wood are both good options, but make sure they are safe for growing edible plants. Also, consider the height of the planter and whether you will need to add a trellis or support for climbing plants.
According to a study by the University of Bristol, gardening can improve mental health and well-being. So, building raised patio planters not only adds some greenery to your outdoor space, but it can also have positive effects on your mental health.
For more information on building raised patio planters, check out this article from HGTV.
Steps to build raised patio planters - A. Choosing the right location
If you are planning to build raised patio planters, it is important to choose the right location to ensure that your plants thrive. Here are some important factors to consider:
- Sunlight: Choose a location that receives at least 6 hours of sunlight a day. Most plants need sunlight to grow and thrive.
- Drainage: Ensure that the location has good drainage. Poor drainage can lead to waterlogged soil, which can harm plants.
- Proximity to water source: Make sure the location is close to a water source. Watering the plants regularly is crucial for their growth and survival.
- Accessibility: Choose a location that is easily accessible. You'll want to be able to easily tend to your plants, harvest them, and add soil and compost to the planters as needed.
By carefully considering these factors, you can choose the right location for your raised patio planters, which will help ensure that your plants grow and thrive.
For more information on raised patio planters, check out this article from Better Homes & Gardens.
🎨 Visualize Your Dream Garden Today!
Transform any outdoor space into a professional landscape design in minutes. Just upload a photo, choose your style, and let our AI do the rest.
Start your garden transformation now →Steps to Build Raised Patio Planters - B. Preparing the Area for Construction
Before starting the construction of raised patio planters, it is important to properly prepare the area. This will ensure that the planters are stable, long-lasting, and functional. Here are the steps to prepare the area:
- Clear the area: Remove any debris, rocks, or vegetation from the area where the planters will be constructed. This will prevent any obstructions that could affect the stability of the planters.
- Level the ground: Use a shovel to level the ground where the planters will be constructed. This will ensure a sturdy base for the planters.
- Mark the area: Use stakes and string to mark the area where the planters will be constructed. This will give a clear outline of the project and help with measuring and leveling.
- Measure the area: Measure the area to determine the amount of materials needed for construction. This will prevent any wastage or shortage of materials.
- Choose the materials: Decide on the materials to be used for construction. This will depend on personal preference, budget, and the intended use of the planters. Common materials include wood, concrete blocks, and bricks.
Proper preparation of the area is crucial for the construction of raised patio planters. By following these steps, you can ensure a stable and functional end product.
For more information on raised patio planters and their benefits, check out Better Homes & Gardens.
Steps to build raised patio planters - C. Building the frame
Building the frame is a crucial step in constructing a sturdy and long-lasting raised patio planter. Here are the steps to follow:
- Measure and cut the wood pieces for the frame. Use pressure-treated lumber to ensure durability and resistance to rotting.
- Join the pieces together using exterior screws or galvanized nails. Make sure the corners are square and flush.
- Attach corner brackets for added stability. These brackets will prevent the frame from shifting over time.
- Use a level to ensure the frame is even and adjust if necessary.
- Consider adding a bottom to the planter frame to prevent soil from spilling out of the bottom. Use a mesh screen or landscape fabric to allow for drainage.
Building a raised patio planter frame requires precision and attention to detail. It is important to take the time to properly measure and cut the wood pieces to ensure a secure and stable structure. By following these steps, you can create a beautiful and functional raised patio planter that will enhance the look of your outdoor space.
For more information on raised patio planters, check out this article from Gardening Know How.
Steps to Build Raised Patio Planters - D. Adding the Base Layer
Adding the base layer is a crucial step in building raised patio planters. It provides a stable foundation for your planter and helps with drainage. Here are the steps to add the base layer:
- Start by selecting a suitable base material. Gravel or crushed stone are good options as they allow for proper drainage.
- Spread a layer of the selected material at the bottom of your planter. The layer should be about 2-3 inches thick.
- Using a tamper, compact the layer until it is level and firm. This will prevent the planter from shifting or settling over time.
- Repeat the process until the entire base is covered with the selected material. The final layer should be level with the top of the planter.
Adding a base layer to your raised patio planter not only provides a stable foundation, but it also promotes proper drainage. This helps to prevent water from accumulating in the planter, which can lead to root rot and other plant diseases.
If you're looking for more tips on building raised patio planters, check out this helpful guide from Better Homes & Gardens.
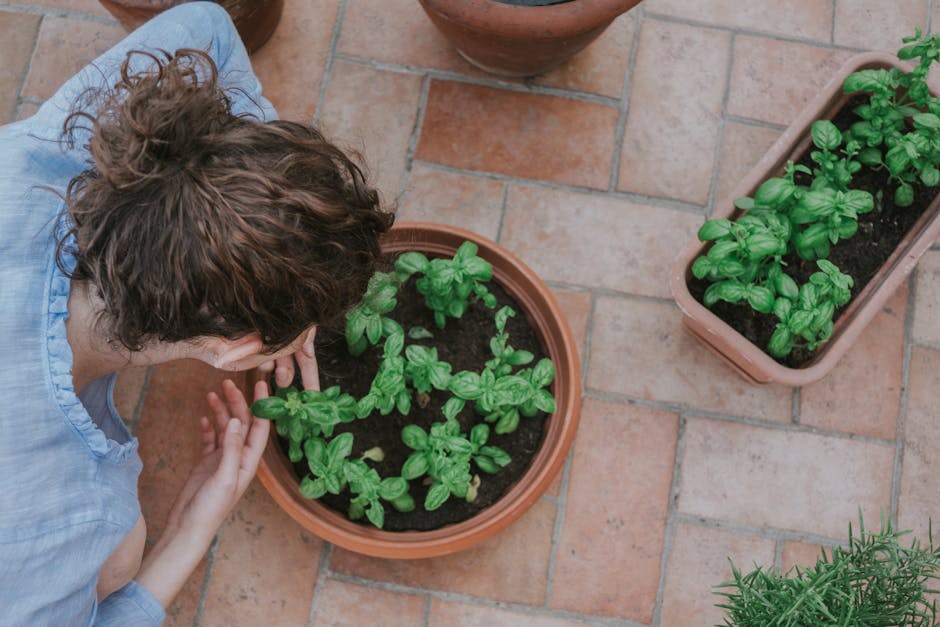
Steps to Build Raised Patio Planters - E. Adding the Soil and Plants
Now that you have built the raised patio planters, it is time to add soil and plants. Follow these steps to ensure that your plants have a healthy growing environment:
- Choose the right soil: It is important to choose the right soil for your raised patio planters. Look for soil that is specifically formulated for container gardening. This type of soil is light, airy, and has good drainage. Avoid using soil from your yard, as it can contain weed seeds, pests, and diseases.
- Add compost: Adding compost to your soil will help to improve soil structure, increase nutrient content, and promote healthy plant growth. You can either make your own compost or purchase it from a local garden center.
- Fill the planter: Fill the planter with soil, leaving about an inch of space at the top. This will allow for room to water the plants without overflowing the planter.
- Choose your plants: When choosing plants for your raised patio planters, consider the amount of sunlight the area receives, the size of the planter, and the type of plants you want to grow. Some popular container plants include herbs, vegetables, and flowers.
- Plant your plants: Once you have chosen your plants, carefully remove them from their containers and plant them in the soil. Be sure to space them out evenly and follow the planting instructions for each specific plant.
- Water your plants: Water your plants thoroughly after planting, and then regularly throughout the growing season. Check the soil moisture level by sticking your finger into the soil up to the second knuckle. If the soil feels dry, it's time to water.
By following these steps, you can create a thriving raised patio planter garden. For more information on container gardening, check out The Old Farmer's Almanac.
🌺 Professional Garden Design in Minutes!
Stop wondering what your garden could look like. Upload a photo and let our AI show you 50+ professional design possibilities instantly.
Transform your garden now →Caring for your raised patio planters
Having a raised patio planter is a great way to add some greenery to your outdoor space. These planters provide an elevated platform for your plants, which not only looks great but also makes it easier to tend to them. Here are some tips on how to care for your raised patio planters:
- Water your plants regularly: Since raised patio planters are elevated, they tend to dry out faster than plants in the ground. Make sure to water your plants regularly, especially during hot summer months.
- Provide proper drainage: Proper drainage is crucial for the health of your plants. Be sure to provide drainage holes in the bottom of your planter to avoid waterlogging.
- Fertilize your plants: Raised patio planters require more nutrients than plants in the ground. Use a slow-release fertilizer or organic compost to provide your plants with the necessary nutrients.
- Protect your plants from pests: Pests like aphids and snails can be a problem for plants in raised patio planters. Use natural pest control methods like ladybugs and neem oil to keep them at bay.
By following these simple tips, you can ensure that your raised patio planters thrive and provide a beautiful addition to your outdoor space.
For more information on raised patio planters, check out Gardening Know How's article on the subject.
Caring for your Raised Patio Planters - A. Watering and Fertilizing
Raised patio planters are a great way to add greenery to your outdoor space. However, caring for them can be a bit tricky. Proper watering and fertilizing are two key factors in ensuring your plants thrive in their raised patio planters.
Watering
- Water your raised patio planters deeply and infrequently. This encourages deep root growth and helps the plants become more drought-tolerant.
- Check the soil moisture level before watering. Stick your finger about an inch into the soil. If it feels dry, it's time to water.
- Use a watering can or hose with a gentle spray nozzle to avoid damaging the plants.
- Water in the morning or evening when it's cooler to avoid evaporation.
Fertilizing
- Use a balanced fertilizer, such as a 10-10-10 or 20-20-20, to provide essential nutrients to your plants.
- Apply fertilizer according to the instructions on the package. Over-fertilizing can burn the roots and harm the plants.
- Fertilize your raised patio planters once every four to six weeks during the growing season.
- Consider using organic fertilizers, such as compost or worm castings, to provide natural nutrients to your plants.
By following these watering and fertilizing tips, you can help your raised patio planters thrive and add beauty to your outdoor space.
Sources: Better Homes & Gardens, HGTV
Caring for your raised patio planters - B. Pest control
One of the key challenges associated with maintaining raised patio planters is controlling pests. Pests can wreak havoc on your plants, causing irreparable damage and significantly reducing yields. In this section, we will provide you with some information on how to keep your raised patio planters pest-free.
Identify the pests
The first step in pest control is identifying the pests that are attacking your plants. Common pests that infest raised patio planters include aphids, spider mites, and whiteflies. Look for signs of these pests, such as yellowing leaves, distorted growth, and webbing.
Natural remedies
One of the best ways to control pests in your raised patio planters is by using natural remedies. There are many plants that repel pests, such as marigolds and basil. You can also use neem oil, which is a natural insecticide, to keep pests at bay. Additionally, introducing beneficial insects, such as ladybugs and lacewings, can help control pest populations.
Chemical control
If natural remedies are not effective in controlling pest populations, you may need to resort to chemical control. However, it is important to use pesticides sparingly and to follow all instructions carefully. Choose pesticides that are specifically formulated for the pests you are trying to control, and always wear protective clothing when applying them.
Remember to always read the label of the pesticide before using it. Many pesticides are not safe for use around humans and pets. If you are unsure about which pesticide to use, consult with a professional pest control company.
By following these tips, you can keep your raised patio planters pest-free and healthy. Remember to regularly inspect your plants for signs of pest infestation, and take action immediately if you notice any problems. With a little bit of care and attention, your raised patio planters will flourish.
Sources:
- Planet Natural
- Gardening Know How
- EPA
Caring for your raised patio planters - C. Pruning and harvesting
Pruning and harvesting are important aspects of caring for your raised patio planters. Proper maintenance will ensure healthy growth and bountiful harvests. Here are some tips for pruning and harvesting your plants:
Pruning
- Regularly prune your plants to promote bushier growth and prevent legginess.
- Remove dead, diseased, or damaged branches to prevent the spread of disease.
- Use clean, sharp pruning shears to make clean cuts, and sterilize them with rubbing alcohol between uses.
- When pruning, cut just above a node or leaf to encourage new growth.
Harvesting
- Harvest your plants at the right time to ensure peak flavor and nutrition.
- Check your plants regularly for ripe fruits and vegetables, and harvest them promptly to avoid over-ripening or spoilage.
- For leafy greens and herbs, harvest just a few leaves at a time to allow the plant to continue growing.
- For fruits and vegetables, use clean, sharp scissors or a knife to make clean cuts, and harvest in the morning when the plants are hydrated.
By following these tips, you can ensure healthy growth and bountiful harvests from your raised patio planters. For more information on caring for your raised patio planters, check out this guide from Gardeners.com.
🚀 Ready to Reinvent Your Garden?
Join thousands of homeowners who have transformed their gardens using our AI design tool. Upload one photo to explore endless possibilities.
Get your AI garden designs →Conclusion
After analyzing the benefits and drawbacks of raised patio planters, it is clear that they can be a great addition to any outdoor living space. With their ability to provide better drainage, prevent soil compaction, and offer easier access for planting and maintenance, raised patio planters can help improve the health and growth of your plants.
However, it is important to consider the tradeoffs involved. Raised patio planters can be more expensive than traditional planting methods, and they may require more frequent watering and fertilizing. Additionally, some plants may not thrive in the conditions provided by raised patio planters, so it is important to research which plants are best suited for this type of planting.
Overall, if you are looking to create a beautiful and functional outdoor living space, raised patio planters can be a great option. Just be sure to carefully consider the costs and benefits before making a decision.
For more information on raised patio planters and other gardening tips, check out Better Homes & Gardens or Gardening Know How.
Related Articles

Map My Garden: The Innovative Way to Keep Your Garden Organized
Discover how Map My Garden can help you map out your garden, keep track of your plants, and improve your gardening skills. Learn how to use this innovative tool and take the guesswork out of gardening.

The Benefits of a Rectangular Fence for Your Vegetable Garden
Learn why a rectangular fence is important for protecting your vegetable garden from pests and how to build and maintain it.

How to Start a Child's Garden: Tips and Resources for Parents
Learn how to start a child's garden with these tips and resources for parents. Discover the benefits of gardening for children and how it can improve physical health, cognitive development, and emotional well-being.

Small Vegetable Garden Layout Plans and Spacing: A Guide to Planning Your Garden
Learn how to plan and space your small vegetable garden for a healthy and productive harvest. Discover the importance of layout plans, factors to consider, and maintenance tips for success.

Excel Garden Planner: Benefits, Features, and How to Use
Learn how to create an efficient garden planner using Excel. Discover the benefits and features of an Excel garden planner and get step-by-step instructions on how to use it.

Growing Pepper Plants in a 4x8 Raised Bed: Tips for Maximizing Yield
Learn how to calculate the number of pepper plants for a 4x8 raised bed, factors to consider when planting pepper plants, and tips on planting, caring, and harvesting pepper plants in a raised bed.