10 DIY Eco-Friendly Christmas Garden Decorations
Create beautiful, eco-friendly Christmas garden decorations using natural and recycled materials to celebrate sustainably this holiday season.
By Alfred van der Heide, Founder, AIGardenPlanner. Editorially reviewed for practical garden-planning accuracy.
Want to decorate your garden for Christmas while reducing waste? Here’s how to create beautiful, eco-friendly decorations using natural and recycled materials. These DIY projects not only help the environment but also save money and support local wildlife. Here's a quick overview of the ideas you'll find:
- Foraged Evergreen Wreaths: Use cedar, pine, or fir branches to craft biodegradable wreaths.
- Dried Citrus Garland: Transform orange slices into compostable garlands with a festive scent.
- Upcycled Tin Can Lanterns: Turn tin cans into durable, weather-resistant lanterns.
- Salt Dough Ornaments: Make simple, biodegradable ornaments with flour, salt, and water.
- Pinecone Bird Feeders: Create decorations that also provide food for birds.
- Rustic Birch Bark Planters: Craft natural planters from birch bark for seasonal plants.
- Repurposed Pallet Snowflakes: Reuse wooden pallets to make rustic snowflake decorations.
- Living Succulent Centerpieces: Use succulents for long-lasting, living holiday displays.
- Natural Stone Pathway Markers: Paint festive designs on stones for durable garden markers.
- Moss-Covered Holiday Letters: Spell out holiday words with biodegradable moss.
Why These Projects Work:
- Eco-Friendly Materials: Use natural, compostable, or upcycled items.
- Wildlife Benefits: Some decorations, like bird feeders, support local wildlife.
- Cost-Effective: Many materials can be foraged or repurposed from home.
- Durable Options: Projects like tin can lanterns and stone markers last for years.
Quick Comparison Table:
| Decoration | Materials | Weather Resistance | Environmental Impact | Lifespan | Difficulty |
|---|---|---|---|---|---|
| Foraged Evergreen Wreaths | Evergreen branches | Moderate | High (biodegradable) | 4–6 weeks | Easy |
| Dried Citrus Garland | Citrus slices, twine | Low | High (compostable) | 2–3 months | Easy |
| Upcycled Tin Can Lanterns | Tin cans, LED lights | Excellent | Moderate (recycled) | 5+ years | Medium |
| Salt Dough Ornaments | Flour, salt, water | Poor (indoor only) | High (biodegradable) | Indoor only | Easy |
| Pinecone Bird Feeders | Pinecones, birdseed | Good | Excellent (wildlife) | 2–4 weeks | Easy |
| Rustic Birch Bark Planters | Birch bark, wood | Good | High (natural) | 1–2 seasons | Medium |
| Repurposed Pallet Snowflakes | Wooden pallets, paint | Excellent | Moderate (upcycled) | 3–5 years | Hard |
| Living Succulent Centerpieces | Succulents, containers | Moderate | Excellent (living) | Years with care | Medium |
| Natural Stone Pathway Markers | Stones, outdoor paint | Excellent | High (natural) | Permanent | Easy |
| Moss-Covered Holiday Letters | Moss, cardboard/wood | Good | High (biodegradable) | 5–8 years | Medium |
These projects are perfect for anyone looking to combine festive charm with sustainability. Let’s make this holiday season greener!
Zero Waste Christmas - Decorations - Natural and Simple

1. Foraged Evergreen Wreaths
There’s something timeless and charming about a wreath crafted from branches you’ve gathered yourself. Foraged evergreen wreaths bring a touch of natural elegance to your holiday decorations while keeping costs to a minimum. Let’s take a closer look at the best evergreens to use and how to create your own festive masterpiece.
The top choices for wreath-making include cedar, pine, and fir branches. These evergreens are known for their excellent needle retention, beautiful textures, and that classic Christmas vibe we all love.
Timing your foraging is key. Aim to collect your branches after a hard frost - this helps with needle retention. When trimming, cut 3 to 4 feet from the tip of each branch, making sure to cut just above a growth node so the tree can recover and regrow. To keep your branches fresh, place them in water as soon as possible after cutting.
For a standard 12-inch wreath, you’ll need about 4 pounds of fresh evergreen branches, a sturdy frame, floral wire, and a good pair of clippers. It’s always better to gather a little extra, just in case.
Start by cutting your branches into manageable stems, around 8 to 15 inches long. Remove the stiffer center stems and group the remaining pieces into small bundles of 2 to 4 stems. Use floral wire to attach these bundles to your wreath frame, overlapping them slightly to create a full, lush look. Continue this process until your wreath is complete.
"Wreaths made from fresh foraged materials are a wonderful way to make an entrance look welcoming or to jazz up a drab fence or garden shed." - Stephanie Rose, Garden Therapy
Foraged wreaths are not just beautiful - they’re also a sustainable alternative to store-bought options. Using locally sourced materials helps reduce transportation emissions, unlike artificial decorations, which can have a carbon footprint of around 40 kilograms of greenhouse gas emissions.
To keep your wreath fresh, mist the back every two days and store any extras in a cool, shaded spot. If you’re hanging it outdoors, secure both the top and bottom to ensure it stays in place during harsh winter weather.
"When it comes to foraging for home decor, winter offers so many possibilities. Even the simplest, barest branch or handful of pinecones can be transformed into impressive decorations. And in these tough financial times, making your own decor from foraged natural materials is a satisfying and thrifty way to add festive flair to your home." - Helen Keating, Content Manager, botanist and tree lover
Once your eco-friendly wreath is ready, you’re all set to bring a little holiday magic to your garden or home. Why stop there? Dive into other sustainable holiday projects to keep the festive spirit alive!
2. Dried Citrus Garland
Give your kitchen scraps a second life by turning them into festive holiday decorations with dried citrus garlands. This eco-friendly project transforms leftover orange slices into beautiful, scented accents while cutting down on waste. It’s simple to make and adds a warm, natural charm to your decor.
Start by picking the right oranges for the job. Oranges with thicker skins, like navel oranges, are ideal because they hold their shape better during drying. Slice the oranges into 1/8 to 1/4-inch thick rounds, then pat them dry with paper towels. Lay the slices in a single layer on parchment-lined baking sheets, making sure they don’t overlap.
To dry the slices, preheat your oven to 200°F and bake them for 3–4 hours, flipping them halfway through. You’ll know they’re ready when they feel dry and crisp to the touch. Proper drying not only enhances the garland’s longevity but also prevents mold from forming.
Once your slices have cooled, use a toothpick to make small holes near the rind for threading. Waxed thread works best for stringing because it slides easily through the citrus and offers added durability.
This project doesn’t just beautify your space - it’s also a step toward reducing waste. Citrus peels are often discarded in large quantities, contributing to methane emissions in landfills. By repurposing them, you’re helping the environment. Plus, the natural essential oils in the citrus slices act as insect repellents, making your garland more durable for outdoor use.
Dried citrus garlands can last for years if stored properly. Keep them in a cool, dry place, padded to avoid breakage, and they’ll stay in great condition for up to two years. Their weather-resistant qualities mean they’ll maintain their structure and vibrant color throughout the season. When the holidays are over, you can compost the garland to complete its sustainable journey.
For a personal touch, alternate the citrus slices with wooden beads, small pinecones, or twigs to add texture and variety. The natural golden and amber hues of the dried citrus pair beautifully with evergreen decorations, creating a cohesive and inviting holiday theme. Projects like this not only enhance your holiday decor but also support the greater goal of reducing seasonal waste.
🚀 Ready to Reinvent Your Garden?
Join thousands of homeowners who have transformed their gardens using our AI design tool. Upload one photo to explore endless possibilities.
Get your AI garden designs →3. Upcycled Tin Can Lanterns
If you're into eco-friendly projects that breathe new life into recycled materials, upcycled tin can lanterns are a great choice. These lanterns can add a festive glow to your garden while standing up to winter weather, making them both practical and decorative.
Start by gathering some tin cans from your recycling bin or nearby sources. Give them a good cleaning, removing any labels and sticky residue. To make them safe to handle, use fine-grit sandpaper to smooth out any sharp edges around the rim.
Here’s a pro tip: fill the cans with water and freeze them overnight. This trick keeps the cans from denting while you work. Once ready, secure your design by taping a printed pattern or drawing it directly on the can. Use a hammer and an awl to punch holes, creating your desired pattern, while resting the can on a sturdy surface.
Since these lanterns will live outdoors, weatherproofing is a must. Start with a coat of spray enamel or oil-based primer to prevent rust, then follow up with weather-resistant paint in your favorite colors. For lighting, battery-operated LED tea lights or fairy lights are the safest options. If you prefer real candles, you can secure a tea light by driving a short nail through the can.
To make handles, use 18- to 21-gauge wire and pliers to bend and crimp it into place. If you’re placing the lanterns on the ground, set them on stone or ceramic tiles. This not only protects surfaces from heat but also prevents rust stains.
Sunset Magazine (Dec 2024) showcased these lanterns as perfect for pathways, tree branches, or steps. Their versatility means they work just as well in cozy garden corners as they do in larger outdoor gatherings.
When the season ends, don’t toss them out! Add drainage holes, and you’ve got yourself a stylish planter for herbs or succulents. Thanks to their sturdy metal construction, these lanterns can be a charming, sustainable addition to your home for years to come.
4. Salt Dough Ornaments
Salt dough ornaments are a simple and budget-friendly way to create durable decorations for your garden. With just a few basic kitchen ingredients, you can craft unique outdoor pieces that, with the right care, can last for years.
To make the dough, combine 2 cups of flour, 1 cup of salt, and 1 cup of warm water. The warm water helps the mixture blend smoothly, and choosing store-brand ingredients can help keep costs low. Mix until the dough is firm but pliable. If it’s sticky, add flour a tablespoon at a time. If it’s too dry, gradually add water until the texture is just right. For a bright white finish, use bleached flour. Alternatively, mix in a teaspoon of cinnamon for a warm, gingerbread-like color and scent. Once the dough is ready, use cookie cutters to shape your ornaments into festive forms.
"Salt dough ornaments are an easy and affordable way to achieve that [a neutral color palette with natural materials]." – Tasha Medve
Classic shapes like trees, stars, and snowflakes are easy to create with cookie cutters. For added texture, press a fork into the dough for bark-like patterns, use rubber stamps for intricate designs, or imprint small branches from evergreens for a natural look. A skewer or lollipop stick can be used to add decorative details like dots or stripes. These creative touches make your ornaments stand out while ensuring they’re sturdy enough for outdoor use.
Once the ornaments are completely dry, paint them with outdoor acrylics and seal them right away to protect against moisture. A white base coat can make colors more vibrant, and paint pens are great for adding fine details. If you want to personalize your creations, use letter embossers to stamp names or holiday phrases into the dough before it dries.
Because salt dough absorbs moisture, sealing is crucial. Apply multiple coats of an acrylic-based quick-dry spray sealant to prevent cracking or mold. Avoid products like polyacrylic or polyurethane, as they can yellow over time. This step ensures your ornaments remain durable and safe for outdoor use, while also being made from biodegradable, non-toxic materials.
"Despite if you bake your projects or let them air dry, I highly recommend you taking the extra steps to preserve salt dough almost immediately after it is completely dry." – Maria Louise
If you prefer a natural look, skip the paint and apply two coats of clear sealant. For ornaments decorated with watercolors or alcohol inks, start with a light spray sealant to prevent colors from bleeding.
"Once sealed, they are guaranteed to last a lifetime. This way, you can continue to enjoy your family's memories, year after year." – Maria Louise
Store your finished ornaments in sturdy boxes, with wax or parchment paper between layers to prevent damage. Keep them in a cool, dry place, avoiding areas with high moisture like attics. With proper care, these simple creations can become cherished garden accents that bring joy year after year.
5. Pinecone Bird Feeders
Pinecone bird feeders are a delightful way to combine festive decorations with a bit of wildlife care. These simple yet functional ornaments not only look great in your garden but also provide much-needed support to local birds during the chilly winter months. Plus, they’re made with natural, biodegradable materials, making them an eco-friendly choice.
Start by collecting large, open pinecones from your yard or nearby parks. If your pinecones are closed, you can quickly open them by warming them in a 300°F oven for about 10 minutes or microwaving them in 30-second bursts until they spread out. Once open, clean the pinecones and attach a loop of biodegradable twine securely for hanging.
For the adhesive, unsalted, sugar-free peanut butter works perfectly. In colder areas, suet can be a better option since it holds up well in low temperatures. Spread the peanut butter or suet generously into all the nooks and crannies of the pinecone using a butter knife. Then, press small seeds - like mixed birdseed or sunflower seeds - into the sticky surface, ensuring a good coating.
"Making pinecone bird feeders is more than just a fun crafting activity, it's an opportunity to give back to nature and observe the beauty of birds up close." – Building a Food Forest - Scotland
To attract a variety of birds, choose a seed mix tailored to the species in your area. Once the seeds are applied, hang the feeders in open, sheltered spots where birds can easily access them but predators cannot. This placement ensures both safety and visibility for your feathered visitors.
"These pinecone bird feeders are so easy to make! This is such a fun craft for kids of all ages. Kids, teens, tweens, adults, seniors – Who doesn't love watching a little bit of wildlife in their backyard!?" – Debbie Chapman
The materials used in these feeders naturally hold up well to winter weather. Pinecones are sturdy, and peanut butter or suet remains durable in the cold. However, it’s essential to check your feeders regularly. Replace the coating if you notice any signs of spoilage or mold, and during heavy rain, consider moving the feeders to a covered area to extend their lifespan.
For families dealing with peanut allergies, sunflower seed butter or soy butter makes a safe alternative while providing the same adhesive effect. Once the holiday season is over, you can compost the twine and pinecone remnants. This ensures that your craft leaves no waste behind, while rewarding you with weeks of bird-watching enjoyment.
6. Rustic Birch Bark Planters
If you're looking to add a touch of woodland charm to your holiday garden, Rustic Birch Bark Planters are a fantastic option. These planters, crafted from repurposed birch bark, bring a natural aesthetic to your Christmas décor while being environmentally friendly. The striking contrast of birch bark's white and black stripes provides a beautiful backdrop for seasonal plants.
The ideal time to gather birch bark is during the summer, as it's more durable and flexible then. Look for bark from fallen trees or leftover timber, and aim for pieces about 1 mm (approximately 0.04 inches) thick for the best results. Inspect several logs to find bark with consistent quality.
"It is preferable to use bark stripped from fresh logs for these kinds of crafts; the bark is much more durable and flexible." – jonsbushcraft.com
Once you've collected your bark, start by cleaning it. Use your thumb to gently remove any loose debris from the surface. For a simple approach, wrap the birch bark around an existing flowerpot. Dry bark adheres well with PVA glue, while wet bark can make the process tricky.
For a more durable planter, try rolling a long strip of bark to double its thickness. Secure the seam using small holes and fasten it with wooden pegs or natural fibers like lime bark or spruce roots. This creates a sturdy, biodegradable container that will naturally break down after the holidays.
To finish the planter, cut wooden disks for the base and lid. Taper the inner edge of the lid to ensure a snug fit, and use natural fasteners such as hawthorn thorns to hold everything together.
These planters are perfect for winter-hardy plants like small evergreens, holly, or winter berries. Birch bark offers more than just aesthetics - it has antiseptic properties that help protect plant roots. As it decomposes, it acts as a natural mulch, retaining moisture, regulating temperature, and supporting beneficial microbes in the soil. In the Northeast, birch bark is easy to find at garden centers and craft stores, making this project accessible to many gardeners.
🎨 Visualize Your Dream Garden Today!
Transform any outdoor space into a professional landscape design in minutes. Just upload a photo, choose your style, and let our AI do the rest.
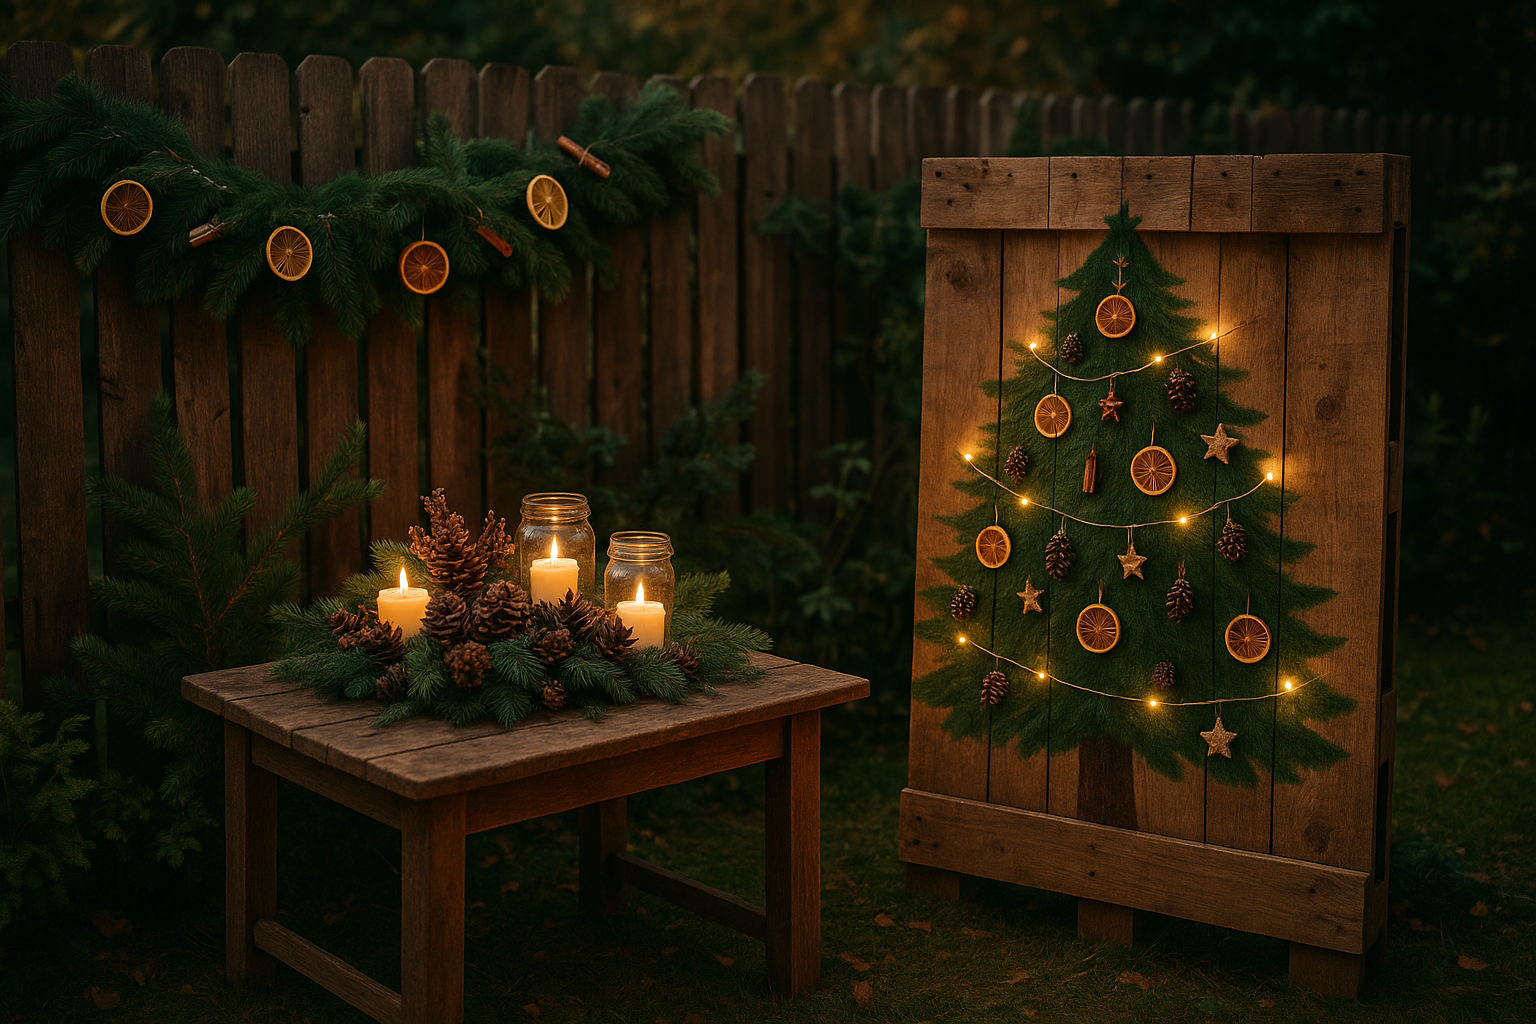
Start your garden transformation now →7. Repurposed Pallet Snowflakes
Turn old wooden pallets into stunning snowflake decorations that bring a festive vibe while giving new life to materials that might otherwise be discarded.
Safety first. Always wear safety glasses and gloves to protect yourself from splinters, nails, and debris while working with pallets. Before you begin, inspect each pallet carefully. Look for stamps indicating how the wood was treated - pallets marked with HT (Heat Treated) are safe to use, but steer clear of any labeled MB (Methyl Bromide), a toxic chemical. Also, avoid pallets with visible stains, mold, or signs of chemical spills, as these could indicate contamination.
To disassemble the pallets, use a hammer and pry bar to carefully remove the slats without cracking the wood. If you're working with multiple pallets and need to speed things up, a reciprocating saw can make the process faster. For stubborn nails, try placing a small block of wood under the hammer's heel - this helps keep the nail straight and makes removal easier.
Pick the best boards. Choose slats that are flat, straight, and no thicker than ½ inch. Look for pieces with natural grain patterns, as these add character to the final design. Be sure to remove all nails completely and check for any leftover wire fragments, especially if you plan to sand the wood.
Once you've selected your boards, it's time to start crafting. Cut six 33-inch pieces for the snowflake's main arms. Next, cut 6–8-inch V-shaped and triangular accents at 30° angles to complete the design. Before assembling, apply a thin coat of white or light gray paint to each piece. Then, lightly sand the painted surfaces to reveal the wood's natural texture, giving the snowflake a rustic, weathered look.
For assembly, use staples long enough to secure the layers of wood firmly. Begin by forming a six-pointed star with the main arms, then attach the smaller V-shaped and triangular pieces to create a detailed, intricate pattern.
Protect your work. To ensure your snowflakes last through the seasons, apply a waterproof wood sealer like linseed oil or polyurethane. Marine-grade spar varnish is another great option because it stays flexible as the wood expands and contracts with temperature changes. A flexible, waterproof finish will guard against both moisture and UV damage.
To keep your snowflakes looking their best, place them on elevated, well-drained surfaces. Clean them occasionally with mild detergent and reapply the protective coating as needed. This project not only adds charm to your holiday decor but also helps reduce waste by reusing materials in a creative way.


Your garden could look like this!
Upload a photo and get professional garden design ideas in seconds.
Design your garden in 3D — free, no sign-upsbb-itb-4d6a8dd
8. Living Succulent Centerpieces
Turn ordinary containers into eye-catching displays with live succulents that thrive all year long. Unlike traditional cut flowers, these living centerpieces provide lasting beauty, reduce waste, and make a stylish, eco-friendly addition to your decor.
Pick the perfect container. Almost anything can be transformed into a home for succulents - think repurposed wine glasses, wooden boxes, galvanized trays, or ceramic bowls. Terra cotta pots are a standout choice because they let the soil breathe and help prevent excess moisture. For a holiday vibe, try festive containers like vintage Christmas tins or decorative baskets. No matter what you choose, ensure proper drainage by drilling holes in the base or adding a layer of pebbles. Once your container is ready, it’s time to choose your plants.
Choose the right mix of succulents. For a visually appealing arrangement, combine succulents of different sizes, shapes, and colors. Echeverias bring rosettes in shades of blue and purple, while jade plants offer classic green tones. Add trailing sedums for movement, and sprinkle in small cacti for texture. To match the holiday spirit, look for succulents with red-tinged or silvery-blue leaves that complement traditional seasonal colors.
Planting with style. Use a well-draining cactus soil mix to keep roots healthy and avoid rot. Start by placing larger succulents as focal points, then fill in the gaps with smaller varieties, spacing them about half an inch apart to allow for growth. You can elevate the holiday theme by adding pinecones, Christmas berries, or miniature ornaments. A final layer of decorative pebbles or moss gives your arrangement a polished, professional finish.
For inspiration, take a cue from JoyUsGarden, who created seven festive succulent centerpieces using 6-inch terra cotta pots, 8-inch bowls, 2-inch succulents, and holiday accents like pinecones and Santa-themed salt and pepper shakers. Their total cost of $180.50 resulted in arrangements that lasted well beyond the holiday season.
Caring for succulents in winter. During the colder months, succulents enter a dormant phase and need some adjustments to thrive. Place your centerpieces near south- or west-facing windows to maximize light, or use grow lights to prevent stretching. Keep indoor temperatures between 60°F and 75°F, and avoid placing arrangements near heating vents or drafts.
Water sparingly - about once every 3–4 weeks when the soil is completely dry. Use the toothpick test: insert a toothpick into the soil, and if it comes out dry, it’s time to water. Avoid misting, as it can cause rot in cool, humid conditions. Skip fertilizing during winter, as succulents aren’t actively growing. Following these tips will keep your centerpiece healthy through the season.
Keep the beauty going. These living centerpieces aren’t just for the holidays. After the season, remove any festive decorations and enjoy your succulent arrangement year-round. Many succulents will continue to grow and even produce cuttings for new projects. With proper care, a single centerpiece can become the starting point for an entire succulent collection, making this a long-lasting and eco-conscious choice for decorating.
9. Natural Stone Pathway Markers
Add a festive touch to your garden paths with painted stone markers that are durable, weather-resistant, and environmentally friendly. Here's how you can prepare and design these long-lasting decorations.
Getting your stones ready
Start by gathering smooth river rocks or uniquely shaped stones - perfect for creating a variety of holiday designs. Be sure to wash and dry them thoroughly. To ensure your paint adheres well, lightly sand any rough areas and apply a primer before you begin painting.
Designing your festive motifs
Sketch your holiday designs with a pencil first - think snowflakes, stars, candy canes, or even words like "Joy" and "Peace." Use acrylic paints with fine-tipped brushes for precision, and add intricate details with paint pens. Apply thin layers of paint, letting each coat dry completely before adding the next.
Sealing for durability
Once your designs are dry, protect them from winter weather by sealing the stones. Use outdoor polyurethane or a waterproof sealant, applying it in light, even coats.
"If you're worrying about expense, a little goes a long way, so it lasts for a long time." – Bronwyn Giblin
Why choose natural stone?
Natural stones are not only beautiful but also renewable and recyclable, offering a more sustainable option compared to synthetic decorations.
Placing and reusing your markers
Position your painted stones along garden paths, at intersections, or around flower beds. Their natural weight keeps them in place even on windy days, while the sealant ensures their colors remain vibrant. Once the holidays are over, you can repaint them with new designs to suit the next season.
10. Moss-Covered Holiday Letters
Bring a touch of nature to your holiday decor with moss-covered letters that harmonize perfectly with your garden's natural charm. These eco-friendly decorations can spell out festive words like JOY, PEACE, or NOEL, all while reflecting a thoughtful commitment to sustainability.
Building Your Letter Base
Start by crafting the foundation of your letters using recycled shipping cardboard. Trace the desired shapes onto the cardboard and carefully cut them out. To ensure durability - especially for outdoor use - reinforce the edges with masking or painter's tape. This sturdy base creates a reliable foundation for your moss masterpiece.
If you're looking for something more weather-resistant, reclaimed wood is a fantastic alternative. Old fence boards or pallet wood are ideal, offering greater durability against winter weather compared to cardboard.
Applying the Moss
Sheet moss with a thin web backing is your best friend for this project - it’s much easier to handle than loose moss varieties. Apply hot glue in small sections across the surface of the letters, pressing the moss into place while the glue is still warm. Work methodically from one edge to the other to ensure even coverage.
"Next I applied hot glue in sections and pressed the sheet moss into place. With the moss in place on the front flat surface, I started gluing moss around the edge." – Michelle, Thistle Key Lane
Once the moss is attached, trim any excess with scissors to create clean, polished edges. For the back of the letters, you can either paint them in a complementary color or add an extra moss layer for a finished look.
Installing for Outdoor Use
To display your moss-covered letters, consider mounting them on garden fences, tree trunks, or outdoor walls. Command Picture & Frame Hanging Strips are a great choice for temporary displays. They’re easy to remove after the holidays without leaving marks or damage. If you prefer a ground display, use wooden stakes to prop up the letters, or lean them against existing garden structures. This setup allows your moss letters to blend seamlessly into your winter garden, adding a festive yet natural touch.
Why It’s Eco-Friendly
Preserved moss is not only beautiful but also incredibly low-maintenance. It doesn’t require watering or special lighting, making it an environmentally conscious choice that conserves resources. Unlike plastic decorations, moss letters are biodegradable, reducing landfill waste. Plus, preserved moss has a lifespan of 5–8 years, making it a long-lasting option for sustainable holiday decor.
"This plant piece is built of organically grown plants. The use of these sustainable materials produces far less waste than other types of products, such as plastic plants, resulting in less landfill waste, less energy consumption, and a lower overall impact on the environment." – Forest Homes
To keep your moss letters looking vibrant, avoid placing them in direct sunlight or near heat sources. When they need cleaning, use a soft duster or dry cloth to gently remove dust. These simple care tips ensure your moss-covered letters remain a festive, eco-friendly highlight for years to come.
🌺 Professional Garden Design in Minutes!
Stop wondering what your garden could look like. Upload a photo and let our AI show you 50+ professional design possibilities instantly.
Transform your garden now →Comparison Table
The table below provides a quick overview of eco-friendly decorations to help you choose the best project for your garden based on climate, materials, and maintenance needs.
| Decoration | Primary Materials | Weather Resistance | Environmental Benefits | Difficulty Level | Lifespan |
|---|---|---|---|---|---|
| Foraged Evergreen Wreaths | Evergreen cuttings (holly, pine, cedar), dried berries, orange slices | Moderate – Offers some protection but needs shelter from heavy rain | High – Fully biodegradable and supports local ecosystems | Easy | 4–6 weeks |
| Dried Citrus Garland | Citrus fruits, twine or fishing line | Low – Vulnerable to moisture and freezing temperatures | High – Compostable and reduces food waste | Easy | 2–3 months (indoors) |
| Upcycled Tin Can Lanterns | Tin cans, soy/beeswax candles or LED tea lights, twine | Excellent – Metal construction withstands weather | Moderate – Prevents metal waste and uses renewable candle materials | Medium | 5+ years |
| Salt Dough Ornaments | Salt, flour, water, optional spices | Poor – Dissolves in rain and cracks in freezing temperatures | High – Made from kitchen staples, biodegradable, and non-toxic | Easy | Indoor use only |
| Pinecone Bird Feeders | Pinecones, peanut butter, birdseed | Good – Natural materials handle outdoor conditions well | Excellent – Provides food for wildlife and supports bird populations | Easy | 2–4 weeks |
| Rustic Birch Bark Planters | Birch bark, wood glue, pinecones, holly leaves, berries | Good – Naturally water-resistant; occasional sealing needed | High – Uses fallen bark, decomposes naturally, and creates microhabitats | Medium | 1–2 seasons |
| Repurposed Pallet Snowflakes | Old wooden pallets, weather-resistant paint | Excellent – Treated wood lasts multiple seasons | Moderate – Reduces lumber waste and landfill burden | Hard | 3–5 years |
| Living Succulent Centerpieces | Succulents, hot glue gun, jewelry wire, Spanish moss | Moderate – Tolerates cold but needs freeze protection | Excellent – Living decoration that improves air quality and offers lasting appeal | Medium | Years with care |
| Natural Stone Pathway Markers | Natural stones, outdoor paint | Excellent – Endures all weather conditions | High – Uses natural materials and creates wildlife-friendly installations | Easy | Permanent |
| Moss-Covered Holiday Letters | Moss, letters | Good – With proper maintenance, lasts outdoors | High – Fully biodegradable and reduces reliance on plastic decorations | Medium | 5–8 years |
Climate Considerations
For areas with harsh winters, decorations like tin can lanterns, pallet snowflakes, or stone pathway markers are ideal. These materials handle temperature changes without cracking or breaking down.
Wildlife Impact
Decorations such as pinecone bird feeders and living succulent centerpieces provide food and shelter for wildlife. Experts emphasize their benefits for birds, bees, and other small animals during the colder months. To protect your garden's ecosystem, avoid decorations with glitter or synthetic materials that could harm wildlife.
Maintenance Requirements
Some decorations, like salt dough ornaments and dried citrus garlands, require extra care and are best suited for indoor or covered settings. On the other hand, stone pathway markers and tin can lanterns are low-maintenance options and perfect for gardeners with limited time.
Cost Effectiveness
Foraged evergreen wreaths and pinecone bird feeders are budget-friendly as most materials can be gathered from your yard or nearby areas. While living succulent centerpieces may involve higher upfront costs, they offer long-term value and can grow over time. Check the detailed project guides for step-by-step instructions on creating these decorations.
Conclusion
Making your own eco-friendly Christmas garden decorations is a meaningful way to celebrate the holidays while caring for the planet. Wendy Graham, founder of Moral Fibres and a sustainability advocate, puts it best:
"The most eco-friendly Christmas decorations are the ones you already own. Re-using what we already have is always the absolute pinnacle of zero waste".
By opting for natural and recycled materials, you can help reduce the staggering amount of non-biodegradable holiday decorations that end up in landfills each year, contributing to environmental harm. A DIY approach not only cuts down on waste but also transforms everyday items like pinecones or tin cans into charming ornaments. Plus, using biodegradable materials - such as evergreen trimmings, moss, or citrus peels - ensures your creations won't leave a lasting environmental footprint.
Crafting sustainably also deepens your connection to nature and supports ethical practices that benefit local ecosystems. Projects like pinecone bird feeders or succulent centerpieces go beyond decoration - they actively enhance biodiversity in your garden. These thoughtful touches show that holiday celebrations can coexist with environmental responsibility, turning your garden into a festive, eco-conscious haven.
To take it a step further, tools like AIGardenPlanner can help you seamlessly integrate your sustainable decorations into your garden's design. This platform allows you to upload photos of your garden, experiment with different layouts, and coordinate decoration placement with existing plants and structures. Whether your space is a cozy urban garden or a sprawling landscape, AIGardenPlanner helps ensure your holiday decor complements your garden's year-round look while creating a magical, environmentally friendly celebration.
FAQs
What can I do to make sure my eco-friendly Christmas garden decorations hold up in winter weather?
To make sure your eco-friendly Christmas garden decorations endure the challenges of winter weather, it's crucial to pick materials specifically made for outdoor use. For instance, opt for weather-resistant lights with an IP rating of at least IP23, which helps protect them from dust and moisture. If you're using wooden decorations, applying a clear outdoor polyurethane coating can shield them from water damage and wear. For even greater resilience, materials like aluminum or other rust-resistant metals are excellent choices.
Decorating earlier in the season also has its perks - softer ground makes it easier to secure stakes or supports. Additionally, keep fragile materials warm before installation, as freezing temperatures can make them brittle. Taking these precautions will ensure your decorations remain festive and intact throughout the holiday season.
How can I find natural materials for making eco-friendly Christmas garden decorations?
Natural Materials for DIY Christmas Garden Decorations
Creating your own Christmas garden decorations using natural materials can be both enjoyable and eco-friendly. Start by gathering items like pine cones, twigs, acorns, or fallen leaves from your yard or a nearby park. By using materials that are already on the ground, you can craft without causing harm to plants or trees. Just remember to collect thoughtfully - only take what you need and leave enough behind for local wildlife.
You can also make use of what’s already growing in your garden. Dried flowers, branches, or clippings can be transformed into beautiful decorations. For a festive touch, consider incorporating seasonal produce like dried orange slices or cranberries. Not only do these add vibrant colors, but they also bring a natural, fresh scent to your creations.
To finish your designs, mix these natural finds with items from around your home. Things like ribbons or string lights can elevate your decorations while keeping the focus on reusing and reducing waste. It’s a simple way to celebrate the season while being mindful of the environment.
How do eco-friendly Christmas garden decorations help wildlife and the environment?
🚀 Ready to Reinvent Your Garden?
Join thousands of homeowners who have transformed their gardens using our AI design tool. Upload one photo to explore endless possibilities.
Get your AI garden designs →Eco-Friendly Christmas Garden Decorations
Decorating your garden for Christmas can be festive and kind to the planet when you use natural or recycled materials. For example, DIY birdhouses or feeders can do more than just look charming - they provide much-needed shelter and food for birds during the colder months. Similarly, creating bug hotels can support pollinators like bees and butterflies, which play a vital role in keeping your garden thriving. These small efforts can boost biodiversity and help maintain local ecosystems.
Switching to biodegradable or repurposed materials also means less waste and fewer harmful chemicals seeping into the soil or water - something synthetic decorations often cause. So, by opting for sustainable decorations, you’re not just spreading holiday cheer in your garden; you’re also making a meaningful difference for wildlife and the environment.